Making Homemade Ghee
As a wife and mother, I am always on the lookout for wholesome and healthy food for my family. Having studied Ayurveda – a holistic science dating back thousands of years – I have been able to help bring some of that knowledge to the dinner table. However it is hard work! Finding the right types of foods and organic local products is a constant work in progress!
So I decided to start simple. And I stuck with the basics. Oil! The basics of cooking usually start with some sort of oil or butter that the main dish is created in. This particular type of fat can affect the whole chemistry of the dish. It can bring health, a conglomeration of the foods together and not to mention taste to a whole other level. Since I have been personally raised on ghee and have been aware of its wonderful healing properties, I knew that my family would benefit from consuming this wonderful tasting yet healthy fat.
In the past, due to time constraints, I have purchased my ghee from organic sources. However, the more I studied, the more I realized that each of the many stores and businesses I would purchase ghee from, were lacking in some of the important steps in its creation. Some would consider being organic enough. Others cooking on the full moon or having some mantras and prayers imbibed into them enough. Some have made their ghee’s from salted, unsalted, sweet cream or sweet butter. Is this really the truest form of ghee? I knew that as my schedule lightened, I would have to create my own authentic traditional ghee to help my family and myself reap its truest benefits.
Ghee
But what actually is ghee? Simply put, ghee is a clarified butter, however is that all it is? Ghee is one of the most revered of fats and is sometimes referred to as a ‘clean butter’ meaning that it is butter with all the water and impurities boiled off. Nevertheless it is still much more than that. True authentic and traditional ghee was made with a few points to consider:
- Real ghee should be made from 100% raw grass-fed milk. The process is quite lengthy but if done correctly, yields a delicious golden nectar from the Gods themselves! Considering the time constraints in this modern age, the next best thing is to make ghee from organic cultured butter preferably from grass-fed cows.
- Ghee cooked during the waxing and full moon is most beneficial as it imbibes some of the soma (essence of bliss) qualities of the moon itself. This phase of the moon is a most auspicious time and imparts the vitality and expanding properties of itself into the consciousness of the food thereby nourishing our bodies.
- Using prayers or mantras, in particular the mritunjaya mantra is especially valuable as the healing energies and positive vibes are ingrained into the ghee and renders it far more advantageous to health.
- The consciousness of the cook is vital in creating any dish, however more so with ghee. Since ghee is used so widely and as a wonderful base for cooking, it is particularly important to have the person making it, remain in a calm meditative and happy state.
Health Benefits Of Ghee
The health benefits of ghee are numerous! Amongst improving digestion, memory and a healthy immune system it is also chockful of nutrients and can improve mood and support a healthy weight loss regime.
- Ghee is full of vitamins A and E – thereby promoting good vision, a healthy immune system and proper organ function as well as antioxidant properties
- Ghee also contains Conjugated linoleic acid – if it is made from grassfed cows – another important note to consider using grassfed milk! Consequently it can help to reduce the risk of heart disease
- Ghee is full of short chain butyric acid – which is useful in intestinal support and production of T cells thereby supporting a healthy immune system
- The energy from the short chain fatty acids helps to burn fats promoting a healthy weight
- Ghee is rich in vitamin K2 – an important nutrient for facial and dental health. Therefore ghee can literally make you beautiful! Pregnant mothers would particularly benefit from a regular ghee intake
- The list can go on for eternity!
The Process – From Scratch!
Milk
In order to create ghee, I searched for a reputable source for raw milk. I wanted the process to be as authentic as possible and searched many stores. Luckily I came across a local dairy farm that prided themselves on their well cared for and happy cows. They were also 100% grassfed! Happily I purchased several gallons – having researched that the yield of butter from this much milk was not a large amount!
It is important to note here that some companies which sell organic cultured butter are labelled as pasture fed. On further enquiry I realized that these organizations have cows that are grass-fed 90% of the time, but during winter months are fed grain understandably so. The grains are hormone and antibiotic free and keep in line with the organic diet and regulations. Therefore these butters cannot be labelled grass-fed even though the cows have a predominantly grass-fed diet, and are supplemented with only organic grains. I have had great success using cultured butter made from these cows and I continue to use them even today. I would also recommend making ghee from these types of butters as they are as close to the traditional authentic ghees without having to make your own butter!
The Churn
Churning is essential to the butter making process. I looked at various churns and came across some lovely traditional wooden ones. However I rather preferred the heavy duty glass jar and stainless steel Dazey churns and stuck with that, although the novelty wore off after a few hours of churning! Another important detail to look into is the material of the items that are worked with. Some churns are made from plastics, aluminum and rubber. Not wanting these materials leeching into my butter, I chose to stick to glass and stainless steel. It is also rather simple to create your own butter churn using wood and a large stainless steel pot. Attaching the wooden stick to a stable post and using rope to churn the curd in the pot is a simple yet delightfully traditional method to creating the butter.
Curd
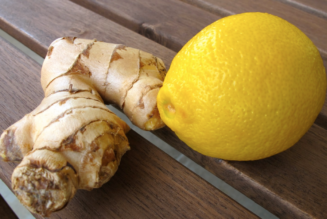
 Curd is the wonderful thick mixture used to create butter. But what is curd? Curd is sometimes (wrongly) classified as yogurt. However there is a simple yet important difference between yogurt and curd. Curd is simply the milk solids that have separated when a natural sour source has been added to the milk. Some of these natural sources include lemon, vinegar, tamarind pods and even chili peppers. Yogurt on the other hand is created by bacterial fermentation using a bacterial inoculation of cultures such as Streptococcus thermophiles, Lactobacillus bulgaricus and Lactobacillus acidophilus amongst others. Whilst both curd and yogurt are great for gut health, I wanted to stick to the traditional use of curd or ‘dahi’ (as it is known in India) in the creation of ghee.
Making curd is simply adding a sour product to warm milk – which then turns to (yes you guessed it!) curd. Sounds simple right? Not so! I had a great learning experience by creating an ineffective curd starter! A curd starter is simply the initial curd used to create a larger batch of curd. My first batch of curd did not set correctly as I didn’t add an adequate amount of starter curd to it. When I tried my second batch, it came out wonderfully and I realized that the curd starter was an interesting aspect to the curd making process. The temperature of the milk is an essential point to note here; when it is too cool it will not set properly and will not turn into an efficient curd.
I wanted to experiment using tamarind pods and chili peppers to see which was the most effective curd starter.

 Results
I used three different curd starters – one with just tamarind pods, another with just chilies and the third with both. They all turned out wonderfully! The chili pepper curd yielded a spicier buttermilk and butter that was simply delicious! Although probably not the greatest butter to use for making ghee! I found that even the curd created using the tamarind and chili was still too spicy. However the curd created using tamarind only was perfect! The butter was thick, delicious. Despite it coming from a smaller batch of curd, it yielded twice as much butter in comparison to the chili curds. The buttermilk produced was milder yet creamier and had a tangy delicious taste.
The steps to making curd starter
Ingredients
- 1 cup of raw grassfed milk
- Whole tamarind pods
- 3 chili pepper stems and 1 chili pepper
- Bring the milk to a boil and let it gently simmer for 5 minutes. This effectively kills any unwanted pathogens that may have gotten into the milk.
- Let the milk cool to body temperature or 110 degrees
- Pour into a glass jar and add the tamarind pods snapped in half and/or chilli peppers
- Half cover with the lid, allowing it to be exposed to some air to provide live cultures
- Leave for 12 hours or overnight
- Curd starter is created! There should be a curdled milk solid which can now be used to create a larger batch of curd
- Note: ideally use a stainless steel pot when cooking and/or boiling milk. This is not an easy thing to find since there are many on the market with tri ply – meaning a core of aluminum. So it is wise to be watchful of the material that your food is placed or cooked in.
The steps to making curd
Ingredients
- 2 gallons of raw grassfed milk
- 6 -10 tablespoons of curd starter
- Bring the raw milk to a boil and continue slow boiling for 10 minutes. Experimentation taught me that raw milk needs a slightly longer boil time to yield good curd.
- Once the milk has cooled to body temperature or 110 degrees, place into a large glass container or stainless steel or clay pot.
- Add the curd starter and gently stir, then cover and wrap in cloth and keep in a warm place overnight.
- Once the curd has set, it should be quite firm and have a slightly sour smell but not putrid. It should taste quite like a mild yogurt.
- Place in the refrigerator for a few hours
- Now we are ready to churn!
Burning butter by making butter!
Once the curd is cool, we can place it in the butter churn and start churning! This can be a lengthy process and it is important to be patient and churn in a clockwise and anticlockwise direction to really churn and not mix. I used the lever of the dazey churn to go back and forth, thereby creating this clockwise and anticlockwise process. It took an hour for the tamarind curd to separate into butter and buttermilk and it took almost two hours for the chilli pepper curd to separate.
Once you see the yellow clumps of butter floating on the buttermilk you are done! Sometimes adding a little ice water to the mixture can help to clump the butter further and you can take it out quite easily. Washing the butter is important since any buttermilk left in the butter can make it go rancid quite quickly. Simply use ice water to scrape the butter in a bowl and rinse until the water runs clear. Now we have collected enough butter to make ghee! But what about the leftover buttermilk?
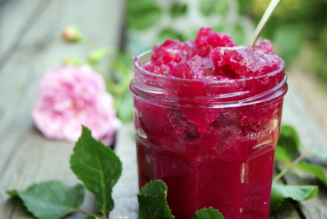
Buttermilk
 Buttermilk has tremendous health benefits. The buttermilk that is left once the butter is taken out is considered true lassi or takra. The health benefits are vast! It is a delicious and refreshing drink for the entire family! Takra is considered beneficial for many G.I. conditions such as IBD and Crohn’s disease as well as poor digestion, hemorrhoids, tumors, edema, diarrhea, anemia, urinary diseases and many other health-related conditions. Adding a pinch of roasted cumin powder and/or black pepper can greatly help with its digestive effects – not to mention making it even more delicious!
“He who uses takra daily does not suffer from diseases, and diseases cured by takra do not recur; just as amrita [divine nectar] is for the gods, takra is to humans.” – Bhavaprakasha Chpt 6.7
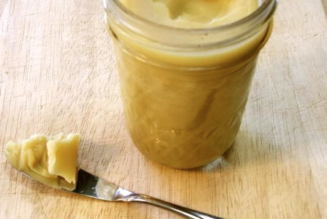
Steps for making ghee – finally!
The Butter
 And so we reach the ghee process at last! As I mentioned earlier, this long procedure to arrive at butter is time consuming and can be a little exhausting (think churning!). So in order to cut some time and create your own batch of divine ghee I would recommend looking into the butters available on the market. Ideally organic grassfed cultured butter is your best bet for making ghee as authentic and pure as possible. However the more I looked into the butters I realized that even cultured organic butter raises questions. For example, what is the difference between European and American cultured butter?
European butter is simply butter obtained using cultures from Europe! However it is also defined as a cultured butter that is churned longer in order to achieve at minimum 82% butterfat. Compared to American cultured butter which is churned to obtain at least 80% butterfat, the European butters usually have a richer flavor and a softer texture.
~Ghee Recipe~
Ingredients
- 1 pound of cultured organic butter (preferably homemade!)
Utensils
- Stainless steel pot
- Cheesecloth and/or fine sieve
- Airtight glass jars
- Place the butter in a stainless steel pan and melt gently on a medium flame. Gas burners are a more preferable method of cooking ghee.
- Once the butter has melted, lower the heat until the butter is gently boiling
- Foam will start to gather and rise to the top – if you want to remove it, do so gently using a wooden spoon – being careful not to stir the ghee. Some sources advise against removing this foam – arguing that it contains medicinal properties. The milk solids will start to gather at the bottom of the pan and it is important to not dislodge this into the ghee.
- Ghee can easily burn so care must be taken to watch over it and prevent too much vigorous boiling- if it has become too brown and gives a nutty aroma it has burned.
- Once the ghee starts to become clear – and you can see the milk solids at the bottom of the pan – it is almost done! The golden liquid will give off a most delightful buttery popcorn aroma – making your kitchen an aromatic heaven!
- Adding a drop of water to the ghee is a good test to see if it is done. If it produces a crackling sound, your ghee is ready! Once the ghee stops sputtering and popping you can switch the gas off. Let it cool down a little – once it is warm it can be filtered into glass jars. It is important to not let it cool too much or else it will conglomerate with the milk solids and all your hard work will be ruined!
- Filter using cheesecloths or fine sieves into dry glass jars or stainless steel containers. It should be kept airtight and in a dark place away from light. Ghee does not need to be refrigerated. Using dry jars are important as even a drop of water can ruin the ghee!
- Ideally ghee should be made during the waxing or full moon – it is useful to consider that the true full moon will only last a minute! So any time after the exact full moon is considered a waning moon. Therefore cooking a few hours before the exact time of the full moon is most beneficial. Be wary of companies who market their ghees using the full moon – it may be helpful to enquire further of the exact time and date that these ghees are created.
- Using mantras or prayers can imbibe the ghee with additional protective healing energies. It is also helpful to keep the cook mindful while he/she is chanting these prayers.
- Placing the ghee on a sri yantra once it is cooked is another consideration. The sri yantra is a sacred geometrical shape which is particularly effective in energizing foods and drinks when used correctly.


![Female Health: Amenorrhea [cessation of menses] – An Ayurvedic Perspective](https://healthyayurveda.com/wp-content/uploads/2015/07/1.-Amenorhea--327x219.png)